 Game Interface[]
|
In this section we'll give you a detailed breakdown of each item on your game screen GUI, what each item is and what to do with it. 1.) Player Character Screen[]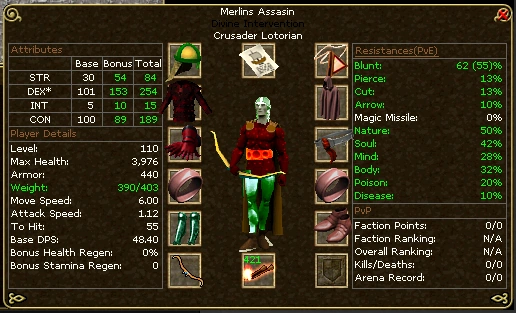 Your player character screen will show you all the information you need to know about your character. It is also the screen that allows you to equip armor and weapons. The hotkey for this screen is "E". We will cover each section in detail bellow
2.) The Map[]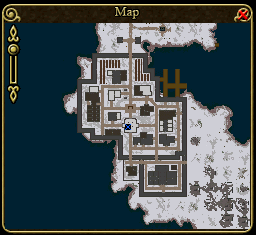 The map will show you the world of dransik shrouded in darkness until explored by you. You can purchase a reveal map and reveal dungeon through the store that will automatically remove the black and reveal the entire world. You can resize the map to fit a specific spot on your screen however it does have a minimum and maximum range. You can also use the scroll bar to zoom in and out. Aside from navigation, a feature within the map is the ability to create tags and name areas. To do this simply right click and hold over the spot you wish to type and drag down to "create tag" and then type whatever you like. Note: Doing this will cover up a portion of the map as it is white text with a black background. If you make a mistake or wish to delete the tag just hover your mouse over the text until you see "Right click to modify tag". There you can either edit the text or delete the tag altogether. Tags are specific to your zoom. For example: If you are zoomed in all the way and create a tag, the moment you zoom out the the tag will disappear and then reappear when you zoom back in. The hotkey for the map is "M" 3.) Chat Window[]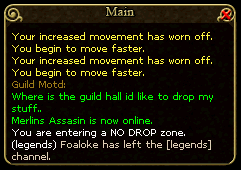 The chat window is, obviously, where you can talk to other people. However it spits out alot more information than that. There you can see information about monsters you are attacking and which are attacking you. It will also display information about spells, weapons, armor, food/drinks, etc. You are able to configure what information is being shown by right clicking the window and selecting/deselecting each item you wish to see or not see. You can even create more chat windows and name each window to break up the information that is being displayed. If you accidentally exit out of the chat you will have to log off and log back in. To learn more about about how to chat with other players and joining channels take a look at Getting Started Part 2. 4.) Backpack[]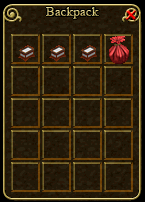 The backpack is where you keep all your items that you keep on you that is not equipped to your character. The standard size backpack is 16 slots but can be expanded to 20 with the purchase of VIP. You can put bags, crates, and boxes in your backpack to increase how many items you can carry. Just keep in mind how much weight your character can hold! Once you backpack is full you will not be able to carry anymore items. There are a few ways to put things in your backpack. The first way is just simply drag and drop items. The second is by hitting the space bar next to a corpse with loot inside. The 3rd is by autoloot, items will automaticaly be put into your backpack when you kill a monster. Note: This can only be done through purchase of VIP or be a member of a party. The hotkey for the backpack is "B". 5.) Hotbars[]The hotbar is tool that is used to be a 'quick hit' for usable items in your backpack. It is also the place where you select spells to be caste. There are 10 hotbars total. To bring one up you simply hit a number above the letters on your keyboard. The default hotbar when you start the game is 0 which you cannot be edited. It houses various windows on the game screen which more easily accessible by hitting its keyboard hotkey. However over each symbol will also the text command you can type in the chat window. The other 9 hotbars are left blank to use however you see fit. A neat trick with the hotbar is that it can swap between horizontal and vertical. To do this simply right click and hold, you will 2 options for Horizontal and Verticle. Just hover which one you wish and unclick your mouse Note: If you run out of a usable item it will become grayed out until you replace it in your backpack. Note: There is currently a bug that will sometimes gray our your hotbar items for no reason. To fix this you can open and close your container, or just replace it. To learn more about the hotbar take a look at General Gameplay. 6.) Runeslots[]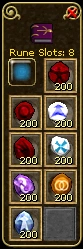 The Runeslots is a window in which you place your runes for casting spells. In order to use this window you must have either a wand, a staff, or a runeslotted weapon equipped. There are many types of weapons that have runeslots and each one will designate how many runes you may equip. This window will also show you how many runes are available to use. You can only place as many runes as the weapon allows. There are some exceptions. For example: With a 7 rune weapon you can place 7 runes and switch to a 5 rune weapon which will only use the first 5 runes placed. The other 2 runes will simply be grayed out until you reequip a 7 rune weapon. To place a rune you can either drag and drop or use the hotbar if you have it set up. Each rune has 200 uses and will show how many uses are left before the rune is destroyed. You can replace runes prior to being destroyed. A neat trick with the runeslots window is that it can swap between horizontal and vertical. To do this simple click and drag against the side of the game screen and it will flip. Another feature is that you can open the spellbook by clicking the book. Lastly there is a check box that will toggle NPC Only on/off. The hotkey for the runeslots window is "C". It will also open (if it is closed) though the spellbook hotkey "V". 7.) Spellbook[]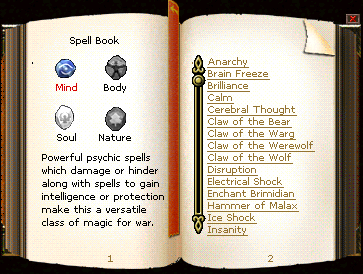 The Spellbook shows you every spell that each rune type can caste. You can sift between spells by clicking on the rune type on the left page, on the right page it will list each spell associated with that rune. From there you can click on a spell and it will take you to another page some information. First is the skill level required to caste the spell. Second is the runeslot requirement, the number shown next to it designate how many runes must be used to caste the spell. Third is weather the a spell is passive or offensive. Underneath will give a brief description of what the spell will do. Displayed bellow will be how much damage each rune costs, how much stamina will be used, and other info. To go back to the first page you can click the "bookmark" on the top of the book. To caste the spells you must drag and drop the spells you wish to use into the hotbar. The hokey for the spellbook is "V". You can also open it through the runeslots window by clicking the book. 8.) Party Window[]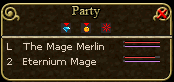 The party window shows you info for when you are in a party...who knew. When you are in a party there will be a variety of buttons that will give you control over what your character can and cannot do. If you are not the leader of the party you will have 3 buttons. 1 will toggle Loot on/off. Another will toggle Gold on/off. The last will exit the party. As the party leader you will have extra buttons to toggle Loot and Gold on/off for the entire party. You will also be given buttons to invite and disband the party. Right clicking on name will pop up another box that shows you even more options. To select one of these options you must continue to hold down the right click and hover over the option you wish to select and release the right click. As most of them are pretty self explanatory we will not cover these in detail. A benefit of being in a party is the ability to auto-loot if you do not have VIP. Another benefit is that you can be assisted with kill counts from other players kills. The hokey for the party window is "P". 9.) Pets Window[]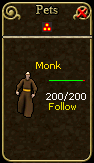 The pets window will show you any NPC follower that you have. The most infamous pet is the Monk. In the pets screen it will show you an avatar of the pet as well as a hitpoints bar. The numbers bellow it designate your pets current health and max health. If you are a mage you have the ability to heal your pet, otherwise hitpoints will regenerate over time. Towards the top you will see a small button that is clickable. This will show you a variety of commands you can issue. We will cover each one in detail bellow. A neat trick is that you can command your pet to stay, take your character far away from your pet, and command your pet to follow. Your pet will automatically transport to your location. Handy to have your pet bypass a dangerous area unharmed. Note: If you log out of the game you will lose your pet! The hotkey for the pets window is "F".
10.) Guild Screen[]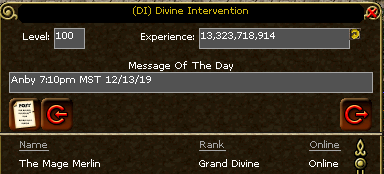 The guild screen can only be accessed by players who are in a a guild...weird huh. There you will see a list of names of all the players in your guild. Players who are listed in white are online while the players listed in red are offline. There is even a section that designates online and offline. There is a ranking system for guilds in which will be displayed as well. Each guild will have different names for different ranks, best to learn whats what when you join. You can even sort each section for easier browsing. At the top of screen you will see the guilds name, level, as well as guild experience. You will also see a message of the day "MOTD". Higher rank guildmates will often leave messages for other players, times of bosses, or just a general messages. If you are able to change the MOTD make sure it is ok to do so by your guild leader. Depending on your rank you will have certain buttons available to you. The paper will change the MOTD, the left arrow will add player to the guild, and the right arrow will exit the guild. As guild leader you will have additional options. Right clicking on a players name will bring up additional options. Depending on your rank you can promote, demote, and kick a player out of the guild. To select one of these options you must continue to hold down the right click and hover over the option you wish to select and release the right click. Note: NEVER use any of these options unless you are allowed to by your guild leader. Improper use of the Guild Menu may result if your expulsion from the guild. The hokey for the guild screen is "G" 11.) Skills Screen[]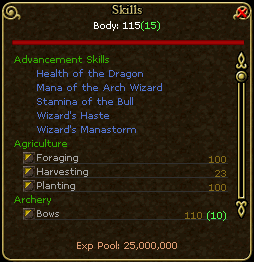 The skills screen will show you all the skills your character has. These include weaponry, tradeskills, and advanced skills. All skills in the game are broken down into sections to make things a bit easier. Next to each skill you will see a small box, clicking that will open up another window that will show you how many experience points are needed for the next level. Clicking the name of each skill will also show you how much experience is needed for the next level and how many experience points total are needed for that level (shown in blue at the top of the screen). If your skill is at 100% it will not show any info. On the right hand side you will see a number, that number indicates that skills level. If you see another number listed next to it in parenthesis that number indicates a bonus to that skill from a weapon, armor, or usable item. Located at the bottom you will see a number, this number is your Experience Pool (epool). Epool is points you can use to spend on skills to level up faster but not all skills can use epool. To use epool you will see a + sign to eligible skills, when you click it a window will pop up asking you how much epool you want to spend on that skill. It is possible to put more epool into a skill that the skill at 100% so be careful not to waste any. Epool will max out at 25 million. For players who are level 106 to 110 you will see the advanced skills you have chosen at each level listed towards the top of the screen. The hotkey for the skills screen is "K" 12.) Feats Screen[]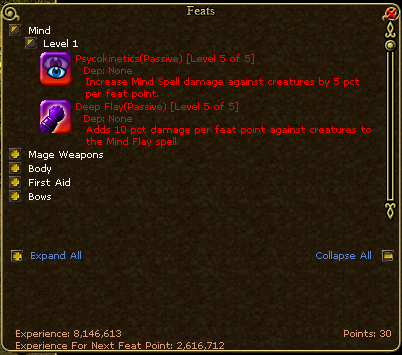 The feats screen can only be accessed by players who are level 100 and up. This screen will show you all the feats available in each category as well as a description of each feat, simply click the plus sign to expand each category. Similar to the spellbook you can drag and drop feats that you have purchased into your hotbar to use. To gain feat points you must slide the percentage bar at the bottom to however much you wish to contribute to feats. Some players like to keep their bar at 10%-25% to earn a little at a time while others like to go full 100% and gain feats quickly, the choice is yours. The numbers at the bottom will designate how many experience points have been contributed to feats and how many more are needed to gain a feat point. At level 110 all experience earned will go to feat points. Lastly the bottom right corner will show you how many feat points you are available to you. The hotkey for the feats screen is "I".
13.) Quest Log[]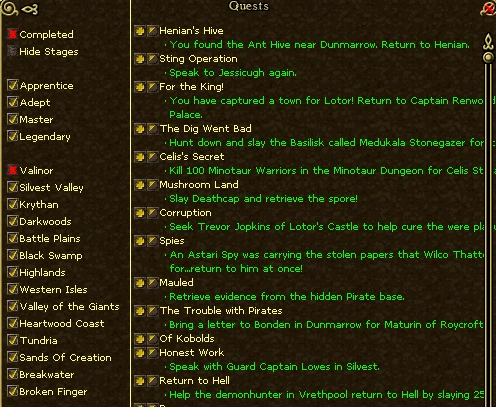 The quest log will show you the list of all the quests you have started in the game. You can select and deselect which quests that will be displayed by difficulty and location. There is also a toggle for completed and stages. Text in green will indicate what needs to be completed for that quest. Quests with a killcount and/or experience count will show where you are (ex. 200/500). You can also open a floater that will display a small window with the quests' information. The hotkey for the quest log is "L". If you need help with quest you can check the quest guide Here NOTE: The quest log is a little buggy, some information and floaters may not display |